The end is coming
Megacool is shutting down on May 1st. Read the announcement here.
Quickstart
Compatibility
The Megacool SDK supports Android API level 19 (4.4, KitKat) and up.
Latest SDK version
5.0.5
Overview
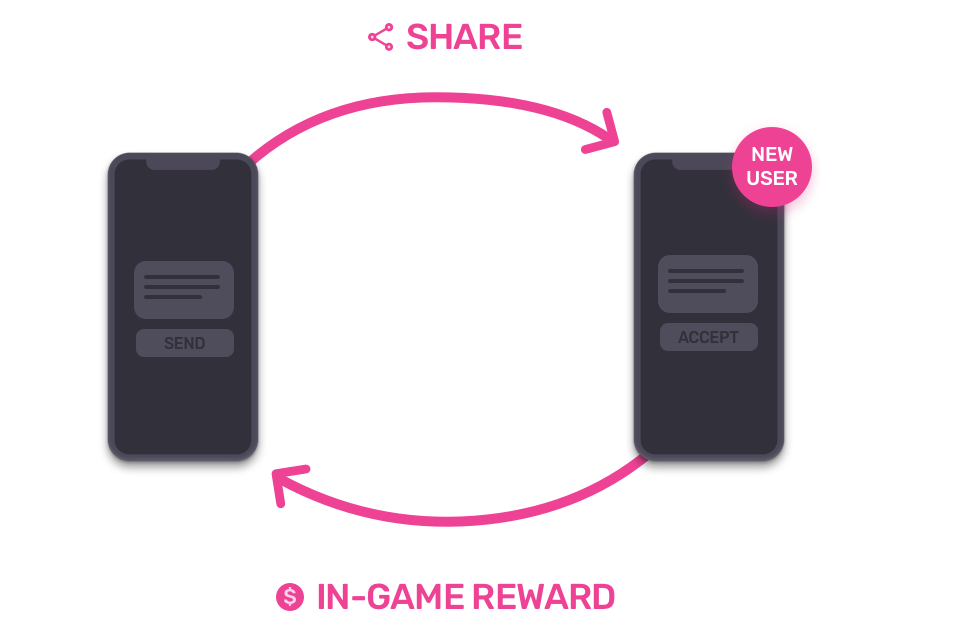
The Megacool SDK provides two ways to boost user growth:
- Incentivize users to refer their friends
- Make it easy to share GIF moments
This quickstart guide will help you set up the basic functionality of the Megacool SDK:
- Step 1: Set up your app on the dashboard
- Step 2: Install the Megacool SDK
- Step 3: Set up referrals
- Step 4: Add media
Step 1: Set up your app on the dashboard
Set up your app on the dashboard to receive the required keys for the SDK. After you're done, refresh this page to see your keys in this guide.
Step 2: Install the Megacool SDK
Gradle is the recommended method to manage dependencies on Android. Add the
following to your app's build.gradle file and sync:
repositories { maven { url 'https://maven.megacool.co/releases' }}dependencies { compile 'co.megacool:megacool:5.0.5'}If you're not using gradle, please send us a message and let us know what would be the best method for you to install the framework! We'll happily provide other avenues as well.
Add deep linking
In your strings.xml file, add two string resources. Note the leading slash for megacool_base_url_path:
You're not logged in, log in to see app configuration for your apps here.
<resources> <string name="megacool_scheme" translatable="false">YOUR_URL_SCHEME</string> <string name="megacool_base_url_path" translatable="false">/YOUR_APP_IDENTIFIER</string></resources>In your AndroidManifest.xml, specify which activities should be initiated upon link click.
You do this by declaring two intent filters for your activity. One is for links of type https://mgcl.co/myAppId/some/path, and the other is for links of type myAppId:///some/path. Add the code below inside the <application> tag.
<!-- Register to handle links via Megacool. This can be any activity --><!-- that you would like to handle links (including your MainActivity) --><activity android:name="com.example.MyLinkClickedActivity"> <!-- Normal https:// links --> <intent-filter android:autoVerify="true"> <action android:name="android.intent.action.VIEW"/> <category android:name="android.intent.category.DEFAULT"/> <category android:name="android.intent.category.BROWSABLE"/> <data android:host="@string/megacool_host" android:pathPrefix="@string/megacool_base_url_path" android:scheme="https"/> </intent-filter> <!-- Links with custom scheme where https doesn't work --> <intent-filter> <action android:name="android.intent.action.VIEW"/> <category android:name="android.intent.category.DEFAULT"/> <category android:name="android.intent.category.BROWSABLE"/> <data android:scheme="@string/megacool_scheme"/> </intent-filter></activity><!-- Ensure we receive referrals from the Play Store --><receiver android:name="co.megacool.megacool.ReferralReceiver" android:exported="true"> <intent-filter> <action android:name="com.android.vending.INSTALL_REFERRER"/> </intent-filter></receiver>Special notes on using INSTALL_REFERRER
The INSTALL_REFERRER broadcast is unique in that it is only sent to a single BroadcastReceiver per app. This can cause conflicts if you are using other tools that also listen for that Intent, or if you have your own BroadcastReceiver listening for it. In order to mitigate this, register a separate BroadcastReceiver to listen for the INSTALL_REFERRER action, and then manually call any other BroadcastReceivers' onReceive() method there.
In the AndroidManifest.xml file, you would place this:
<!-- Ensure we receive referrals from the Play Store --><receiver android:name="com.example.MyReferralReceiver" android:exported="true"> <intent-filter> <action android:name="com.android.vending.INSTALL_REFERRER"/> </intent-filter></receiver>Your MyReferralReceiver class would then look something like this:
package com.exampleimport android.content.BroadcastReceiverimport android.content.Contextimport android.content.Intentimport co.megacool.megacool.ReferralReceiverimport com.example.OtherReferralReceiverclass MyReferralReceiver : BroadcastReceiver() { override fun onReceive(context: Context?, intent: Intent?) { // Instantiate and call the onReceive() method of all other BroadcastReceivers ReferralReceiver().onReceive(context, intent) OtherReferralReceiver().onReceive(context, intent) }}Initialize the SDK
This should be done in onCreate of your custom Application subclass:
You're not logged in, log in to see app configuration for your apps here.
import co.megacool.megacool.Megacoolclass MyApplication : Application() { override fun onCreate() { super.onCreate() Megacool.start(this, "YOUR_APP_CONFIG") }}Step 3: Set up referrals
Make it easy for players to share your game to their friends. Incentivize players by rewarding them for each share they send that leads to a new friend installing the game.
Expand Megacool.start to receive the callback from the server when a share has been opened on a new device:
You're not logged in, log in to see app configuration for your apps here.
Megacool.start(this, "YOUR_ANDROID_KEY", MegacoolConfig() .eventListener(object : EventListener() { override fun receivedShareOpened(event: ReceivedShareOpenedEvent) { Log.d(TAG, "Got event: $event") if (event.isFirstSession) { // This device has received a share and installed the // app for the first time Log.d(TAG, "Installed from a referral from ${event.senderUserId}") } } override fun sentShareOpened(event: SentShareOpenedEvent) { Log.d(TAG, "Got event: $event") if (event.isFirstSession) { // A share sent from this device has been opened, and // the receiver installed the app for the first time Log.d(TAG, "${event.receiverUserId} installed the app from our referral") } } }))Add a referral button
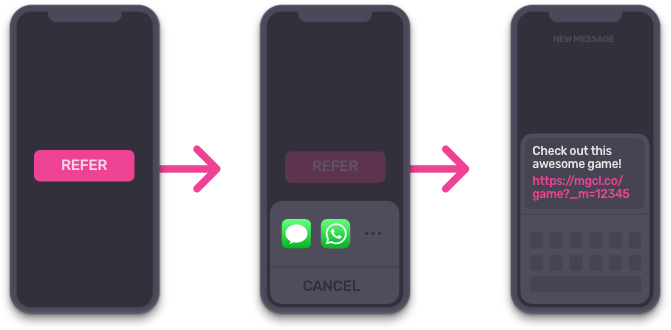
Add a referral button that lets players refer their friends by sharing a link to the game. Call the following method when pressed:
Megacool.share()
This opens a share modal with a link to your game that lets players refer friends through any channel available on their device.
You can read more about referrals here and how to test them here.
Step 4: Add media
Add a recording to the share
To increase the share-to-install conversion rate, make the share more appealing by adding a recording of the game play. When the game session begins, start a new recording:
Megacool.startRecording(view)
The recording will keep a buffer of the last 5 seconds by default. Old frames get overwritten by new frames.
End the recording when the game session is over by calling:
Megacool.stopRecording()
The next time you call Megacool.getInstance().share(context), the latest recording will be included in the
share together with the referral link.
Read more about how to customize recordings here.
Add fallback media
Fallback media is used in cases when there’s no recording or if the recording has failed. The
fallback media can be JPEG, PNG, GIF or even MP4. For historical reasons, the SDK refers to it
as FallbackImage.
Fallback media can be given either as a resource or as an asset path, depending on what is easiest for you. To set the media as a resource:
val shareConfig = ShareConfig().fallbackImage(R.drawable.somefallback)Megacool.share(shareConfig)To set it as an asset:
val shareConfig = ShareConfig().fallbackImageUrl("share_fallback.gif")Megacool.share(shareConfig)When choosing your media file please keep in mind that there's a size limit for some social media platforms, so try to stay below 3MB.
Note: Fallbacks also need to be set on the server-side for the best experience, but we don't have an automatic way to set these yet. Contact us if you want this and we'll help you get it sorted.
Do a test run!
Build your project to a device and run it!
Notice
We strongly believe in not crashing your apps. But, since networking and computers are inherently unreliable, stuff sometimes fails. To prevent your users from noticing these failures, you should always be prepared for our API calls to return nil or other signals of failure, and have a plan if that happens. This can happen if your app runs out of memory, disk is full, or some other bug is present which prevents us from delivering the expected value from our API calls. We believe in the philosophy of progressive enhancement, and this is your best way for interacting with our API as well. In practice, always assume that our tools fail, but rejoice when they are working as promised.