The end is coming
Megacool is shutting down on May 1st. Read the announcement here.
Recording
Types of recording
Time recording
Add the following line of code where you want to start a recording:
Megacool.Instance.StartRecording();
The recording will by default keep a buffer of the last 5 seconds. Old frames get overwritten by new frames. See Max Frames for editing the default setting.
To end a recording, add the following line of code:
Megacool.Instance.StopRecording();
Highlight recording
The highlight recording feature records the ‘most interesting’ part of your game--whether this is an awesome action sequence, or a hilarious ‘fail’. It does this by keeping track of the gameplay's intensity as determined by metrics specific to your game.
Whenever a critical event (such as scoring a point, landing a cool combo, failing in an epic way, etc.) occurs, call this function to make note of the event (and optionally, its intensity):
Megacool.Instance.RegisterScoreChange(); // without intensityMegacool.Instance.RegisterScoreChange(42); // with intensity of 42For easy integration, we suggest ‘piggy-backing’ off your game’s current score system by calling this function whenever the player’s score increases, with the amount that it increases by. We equate ‘intensity’ with a change in point value, but you can also experiment with assigning various intensities to events with subjective ‘cool’ value.
Add the following line of code at the beginning of your game to start capturing your highlight!
Megacool.Instance.StartRecording (new MegacoolRecordingConfig { OverflowStrategy = MegacoolOverflowStrategy.HIGHLIGHT,});Peak location
Different games have different paces: in one game, an awesome move might be followed immediately by bland downtime, while in another game, there might be some cool graphics or an interesting cutscene immediately afterwards. To let you adjust how much to include after the action dies down, try experimenting with the peakLocation parameter. This parameter is specific to highlight recording and controls where the ‘peak’ (or, maximum change in point value) of your highlight occurs. In the previous example, we would want the first game to have a late peak location so we don't record too much boring downtime, and the first game to have an early peak location so we make sure to record the cool after-graphics. The value of the peak location (between 0 and 1, inclusive), determines at what percentage through the recording the peak will be placed.
For example, in a recording with 10 frames, a peakLocation of 0.2 means that the peak will occur near the beginning around frame 2, and a peakLocation of 0.8 means that the peak will occur near the end around frame 8. The default peakLocation is 0.7. You can set the peak location by calling:
Megacool.Instance.StartRecording(new MegacoolRecordingConfig() { OverflowStrategy = MegacoolOverflowStrategy.HIGHLIGHT, PeakLocation = 0.5,});Frame-by-frame recording
Capture each frame of the recording, e.g. on each user tap:
Megacool.Instance.CaptureFrame();
By default max 50 frames will be captured. If it exceeds 50 frames, old frames are overwritten
until Megacool.Instance.StopRecording gets called to reset it. Add the following line of code to stop
a recording:
Megacool.Instance.StopRecording();
Timelapse
Timelapse is identical to the normal captureFrame, except timelapse has different behavior when
overflowing MaxFrames. If it's about to overflow, it will delete every other frame
captured so far, and half the rate of capturing (thus only storing every second image on the first
overflow, every fourth image on the next, and so on).
Megacool.Instance.CaptureFrame(new MegacoolRecordingConfig { OverflowStrategy = MegacoolOverflowStrategy.TIMELAPSE,});If you want to guarantee that a frame is added to the timelapse (like an end screen or final state
of the game), pass a ForceAdd = true parameter to captureFrame like this:
Megacool.Instance.CaptureFrame(null, true);Important: Only pass this parameter once! Normally this function returns as soon as it has
spawned a thread to do the actual capture, but if you pass ForceAdd = true it will
run synchronously (e.g. not return until it has actually stored the frame. This is because usually
this is called as the last step before a session ends and the GIF is created, thus we need the call
to complete before creating the GIF. This enables you to change visible elements on the screen after
this call completes and be sure that it's not going to be included in the GIF.
Screenshot sharing
Screenshot sharing is possible by either using the helper function ShareScreenshot
or by setting max frames to 1 on a recording. The helper function will capture the screenshot and
open the share modal, then delete the recording from disk afterwards.
Megacool.Instance.ShareScreenshot();
If you want to show a preview of the screenshot before sharing, you need to use a regular recording with max frames set to 1.
Rendering preview
This creates a rendered preview of the GIF that can be displayed to the user before sharing.
Drag the MegacoolPreviewCanvas Prefab to your scene
In the script where you want to control the preview, add a public field with type
MegacoolGifPreview. This will expose themegacoolGifPreviewfield in the inspector for the GameObject.public MegacoolGifPreview megacoolGifPreview;Drag the MegacoolGifPreview GameObject onto the open field in the inspector of the GameObject you use. This will attach an instance of the MegacoolGifPreview object to the public field.

You can now call `StartPreview` and `StopPreview` to display or hide the preview.
megacoolGifPreview.StartPreview();
megacoolGifPreview.StopPreview();
Recording frame rate
Set numbers of frames to record per second. Recommended range: 1 - 10. The default is 10:
Megacool.Instance.StartRecording(new MegacoolRecordingConfig() { FrameRate = 8;});Note: This only applies to recordings made with Megacool.Instance.StartRecording, not
Megacool.Instance.CaptureFrame.
Frame rate examples (with Playback frame rate: 10):


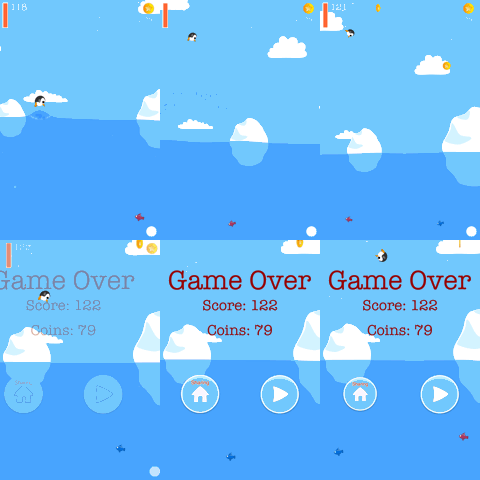
Playback frame rate
Set the number of frames per second when playing the GIF. The default is 12 frames / second. The GIF will be exported with this frame rate and it doesn't affect the recording frame rate. Setting this value higher than the frame rate causes the recording to be sped up, setting it lower means it'll be slowed down.
Megacool.Instance.StartRecording(new MegacoolRecordingConfig() { PlaybackFrameRate = 11,});


Max frames
Max number of frames to record, default is 50 frames. Setting this to 1 will create a screenshot instead of a GIF. Change the maximum amount of captured frames by setting:
Megacool.Instance.StartRecording(new MegacoolRecordingConfig() { MaxFrames = 25,});


Delay last frame
Set a delay (in milliseconds) for the last frame of the GIF. The default is 1 second to give a natural break before the GIF loops again.
Megacool.Instance.StartRecording(new MegacoolRecordingConfig() { LastFrameDelay = 2000,});


Last frame overlay
With last frame overlay you can add a transparent image on top of the last GIF frame.
 +
+ =
=

Create a folder called StreamingAssets if you don't have it already and add the overlay image to the folder. Then call:
Megacool.Instance.StartRecording(new MegacoolRecordingConfig() { LastFrameOverlay = "overlay.png",});Color table
A GIF consists of 256 colors and there are three different ways we can compute those colors, with slightly varying quality and performance tradeoffs. Default is dynamic.
Dynamic
The frames are analyzed before encoding, yielding a good balance between quality and speed. This is the default.
Analyze first
The frames are analyzed before encoding to generate a representative color table. This requires more CPU to create the GIF, but often yields better results when a GIF contains many shades of the same color. This option is only available on iOS, on Android the dynamic color table will be used instead.
Go to Window -> Megacool -> Configuration -> GIF Color Table and select Gif Color Table Analyze First.
It can also be set programmatically:
Megacool.Instance.GifColorTable = Megacool.GifColorTableType.GifColorTableAnalyzeFirst;
Recording customization
Our Unity SDK will by default record everything that happens on screen if it's capable of it,
otherwise it'll fall back to copying whatever is shown by the main camera. If you don't have a main
camera or want your recording to include or exclude certain elements, add the MegacoolManager
script to the camera you want to record from, and hide or include elements with that camera's
culling mask. If you set a custom camera you'll also need to add the line
Megacool.Instance.CaptureMethod = MegacoolCaptureMethod.BLIT; after calling
Megacool.Instance.Start().
Save recordings
Being able to save and resume recordings is useful for combining multiple game sessions together. These recordings are stored to disk to be retrieved and potentially resumed later. This is a great case for turn-based games like Words with Friends where waiting for the other user to finish the round could take many hours, and still create a GIF of the whole game play.
Start and resume a recording
All completed recordings will by default be deleted whenever a new recording is started with either
Megacool.Instance.CaptureFrame or Megacool.Instance.StartRecording. To save a recording you can set
Megacool.Instance.KeepCompletedRecordings = true;
To save multiple recordings you can set a RecordingId in the config
object at StartRecording(MegacoolRecordingConfig config) or CaptureFrame(MegacoolFrameCaptureConfig config). The
RecordingId can be anything you prefer, for instance a name of the current
level like "level3".
A recording with a given RecordingId can be resumed until
Megacool.Instance.StopRecording is called. After calling Megacool.Instance.StopRecording you can either share
the recording or start a new one from scratch with the same RecordingId.
//Save recording of level 3 to diskMegacool.Instance.KeepCompletedRecordings = true;Megacool.Instance.StartRecording(new MegacoolRecordingConfig() { RecordingId: "level3",});Pause recording
When you want to pause a recording that can be continued later, you call
PauseRecording.
Megacool.Instance.PauseRecording();
Delete recording
DeleteRecording will remove any frames of the recording in memory and on disk.
Both completed and incomplete recordings will take space on disk, thus particularly if you're using
Megacool.Instance.KeepCompletedRecordings = true; you might want to provide an interface to your users for
removing recordings they don't care about anymore to free up space for new recordings.
Megacool.Instance.DeleteRecording("level3");Show a GIF from a specific recording
To show a GIF from a specific recording:
Megacool.Instance.StartPreview("level3");Share a GIF from a specific recording
To share a GIF from a specific recording you pass the RecordingId as a parameter to
Share(MegacoolShareConfig config).
Megacool.Instance.Share(new MegacoolShareConfig() { RecordingId = "level3"});Note: Megacool.Instance.Share calls PauseRecording automatically, so
if you haven't called Megacool.Instance.StopRecording before next time you call
Megacool.Instance.StartRecording, the recording will continue from where you paused.